
aka.ms/NetworkSetup: Complete Guide to Microsoft Windows Network Setup & Troubleshooting
aka.ms/NetworkSetup: The Ultimate 2026 Guide to Setting Up and Troubleshooting Your Windows Network Connection
Welcome to the step-by-step guide for Microsoft aka.ms/NetworkSetup. Whether you’re setting up a new Windows 10 or Windows 11 device, connecting to Wi-Fi for the first time, or troubleshooting network issues, this page provides everything you need to get online quickly and securely.
Table of Contents
ToggleWhat is aka.ms/NetworkSetup?
aka.ms/NetworkSetup is Microsoft’s official shortcut for resources and instructions on setting up, configuring, and troubleshooting network connections on Windows 10 and Windows 11 devices.
Whether you’re installing a new PC or fixing Wi-Fi problems, this guide will help you get connected efficiently and securely.
Why Connecting to the Internet Matters
Connecting to the internet during your Windows setup ensures you receive the latest features, security updates, and device drivers.
A stable network connection is essential for:
Completing Windows installation and activation
Accessing Microsoft Store and essential apps
Downloading updates and security patches
Syncing files and settings across devices
Requirements for Network Setup
Before you begin, make sure you have:
A Windows 10 (April 2020 update or later) or Windows 11 PC
A wireless router and modem connected to your ISP
Network name (SSID) and password
Latest network adapter drivers (download from manufacturer if needed)
Ethernet cable (optional, for wired setup)
Tip: If you’re missing drivers, use another device to download them from the manufacturer’s website and transfer via USB flash drive.
Step-by-Step Guide: Setting Up Your Network
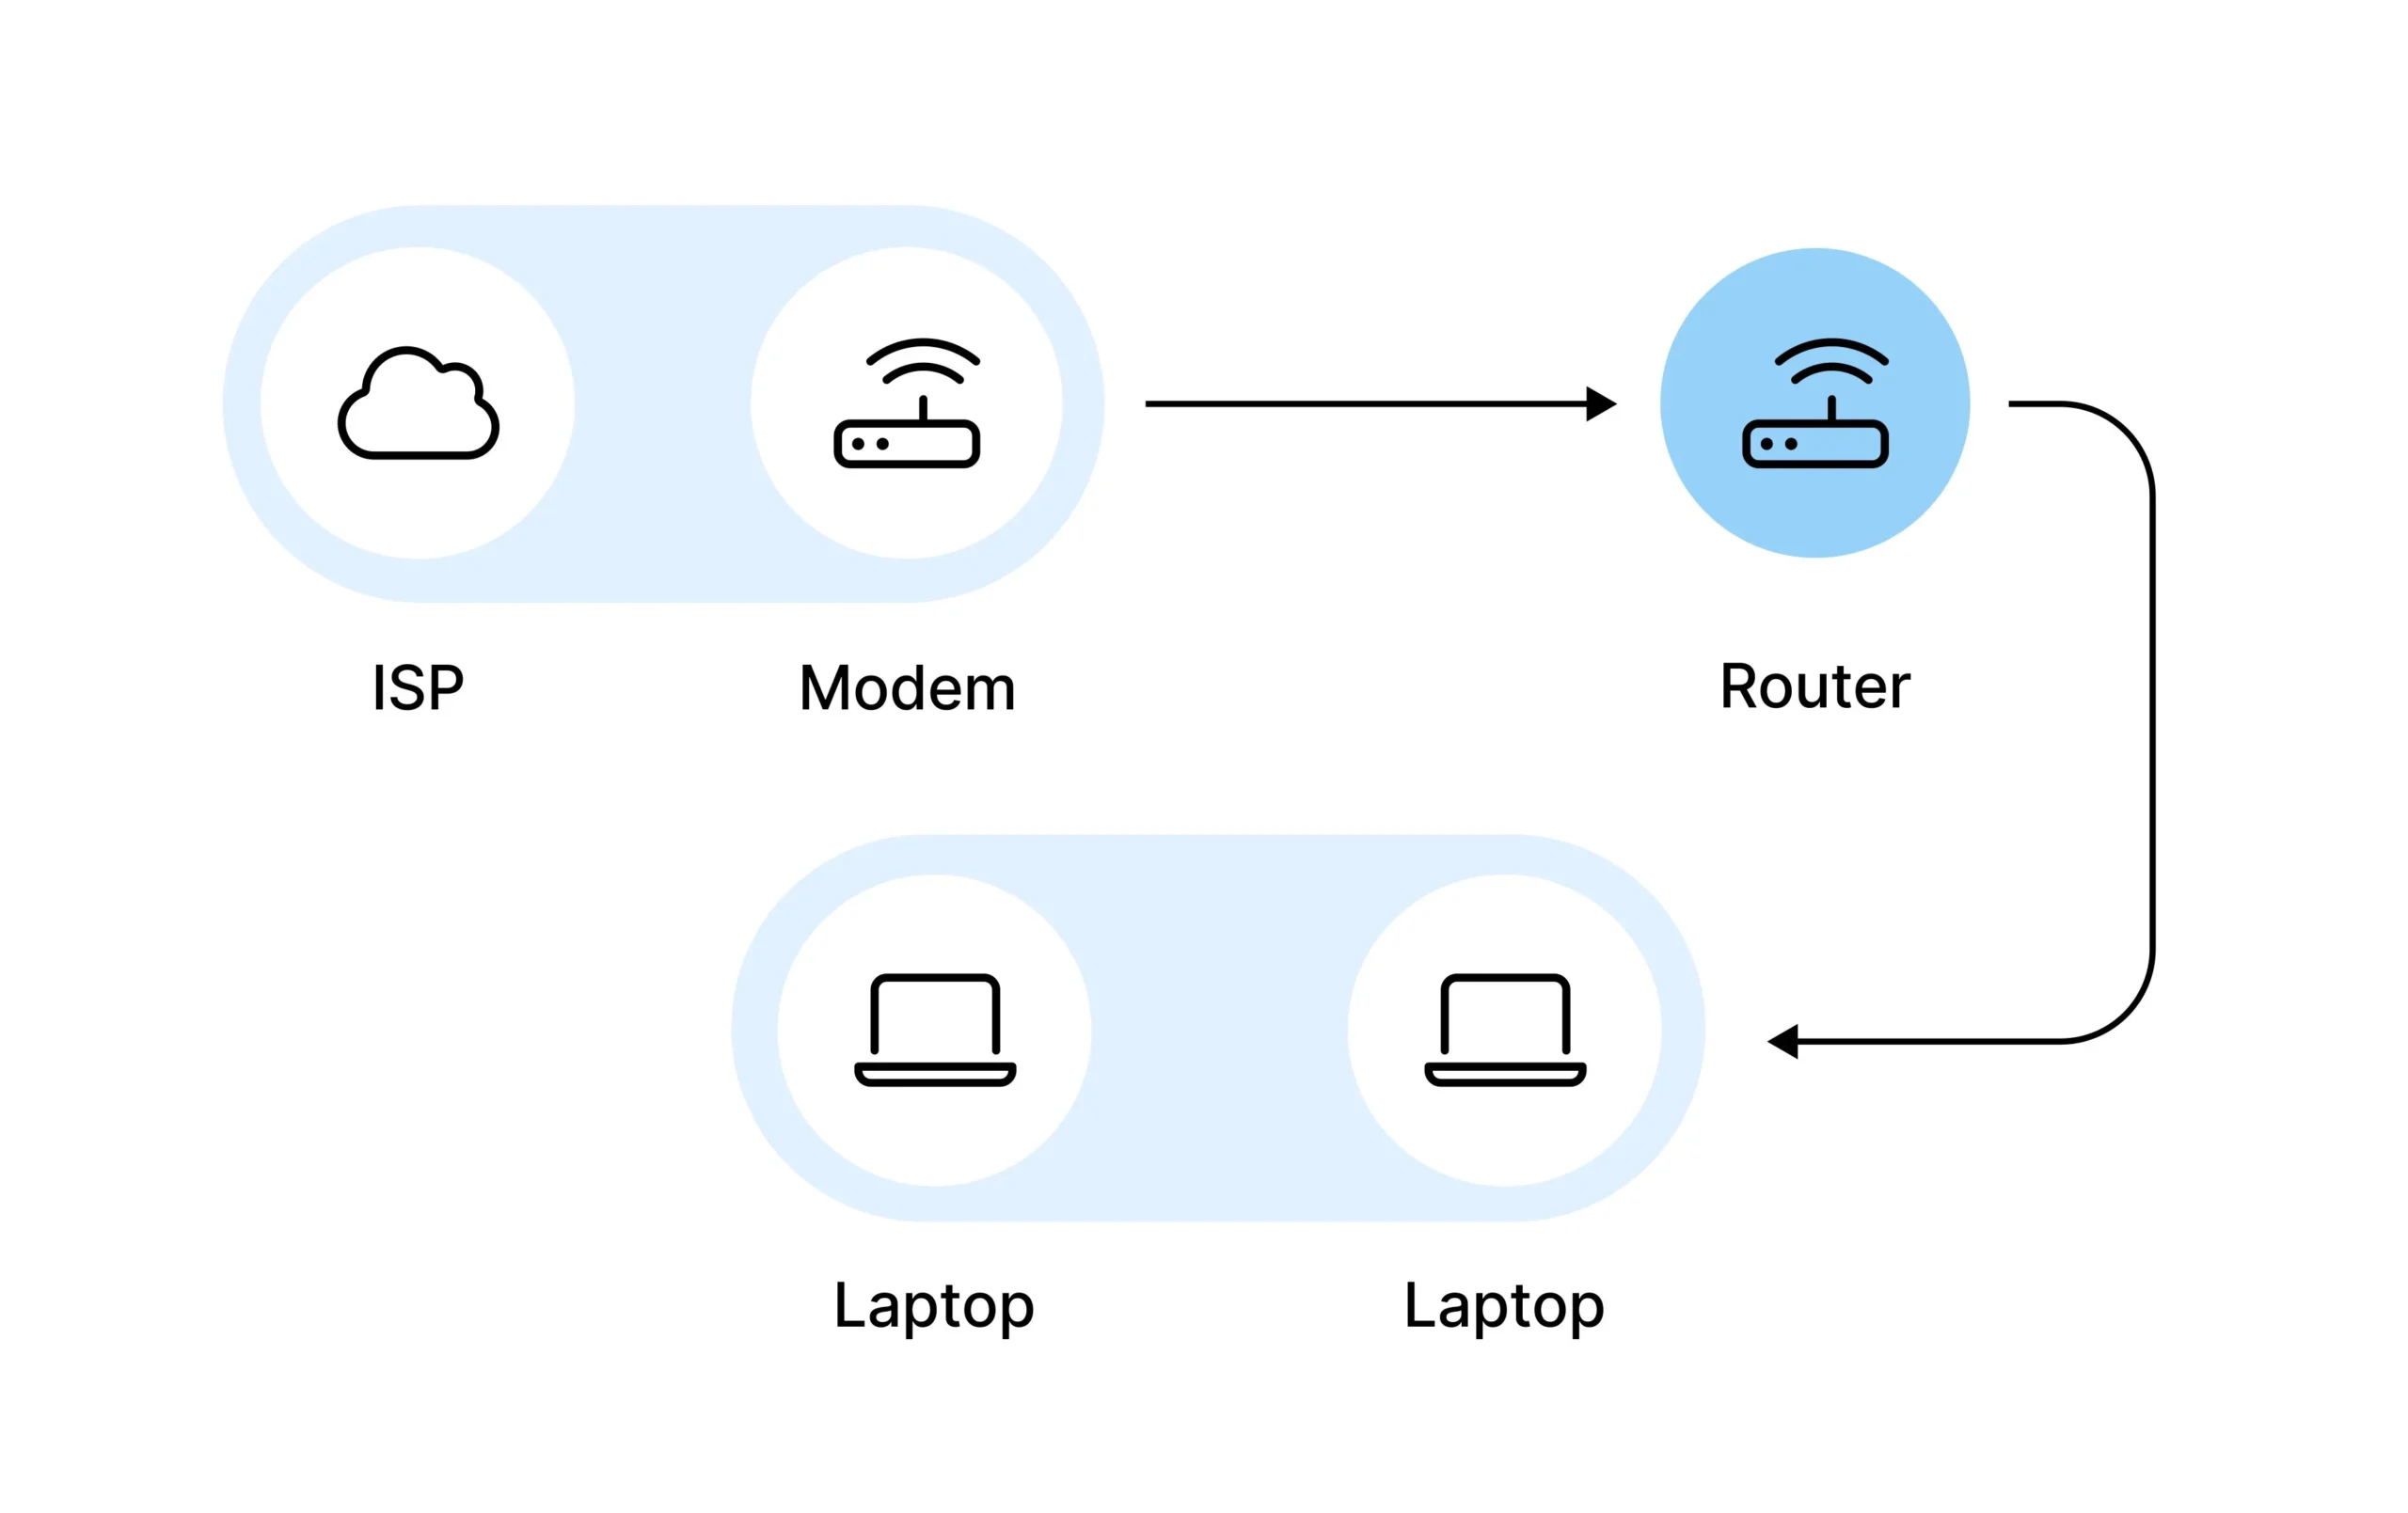
1. Prepare Your Equipment
Modem: Connects to your ISP.
Wireless Router: Broadcasts Wi-Fi signal.
Ethernet Cable: For wired connections.
2. Connect Modem to Router
Plug one end of the Ethernet cable into the modem and the other into the router’s WAN port.
Power on both devices and wait for status lights to stabilize.
3. Access Router Settings
Connect your PC to the router using Wi-Fi or an Ethernet cable.
Open a browser and enter the router’s IP address (e.g., 192.168.1.1).
Log in with the default credentials (usually found on the router).
4. Configure Wi-Fi
Set your SSID (network name) and create a strong Wi-Fi password.
Choose WPA3 or WPA2 security for best protection.
Save settings and reboot the router if prompted.
5. Connect Your Windows Device
On your PC, click the network icon in the taskbar.
Select your Wi-Fi network, enter the password, and connect.
For Ethernet, plug the cable into your PC’s LAN port.

HowTo: Connect to Wi-Fi on Windows 10 & 11
Step 1:
Click the network icon (Wi-Fi bars or globe) in the taskbar.
Step 2:
Select your Wi-Fi network from the list.
Step 3:
Enter the Wi-Fi password when prompted.
Step 4:
Check “Connect automatically” if you want to auto-connect in the future.
Step 5:
Click “Connect” to finish.
Manual Connection (Step 1):
Go to Settings > Network & Internet > Wi-Fi > Manage known networks > Add a new network.
Manual Connection (Step 2):
Enter SSID, security type, and password.
Connect using WPS (Step 1):
Press the WPS button on your router.
Connect using WPS (Step 2):
On your PC, go to Settings > Network & Internet > Wi-Fi > Connect using WPS button.
Troubleshooting Network Issues
If you can’t connect, try these steps:
On Your Wi-Fi Router
Restart your modem and router: Unplug both, wait 10 seconds, then plug back in. Wait for lights to stabilize.
Ensure SSID broadcast is enabled: If your network doesn’t appear, check router settings to ensure the SSID is visible.
On Your Windows Device
Restart your PC.
Toggle Airplane Mode: Turn on, then off.
Forget and reconnect to the Wi-Fi network:
Go to Settings > Network & Internet > Wi-Fi > Manage known networks, select your network, and click “Forget”. Reconnect by entering the password.Update network drivers: Download the latest drivers from your PC manufacturer’s website. If the adapter is missing, install drivers from a USB drive.
Network reset:
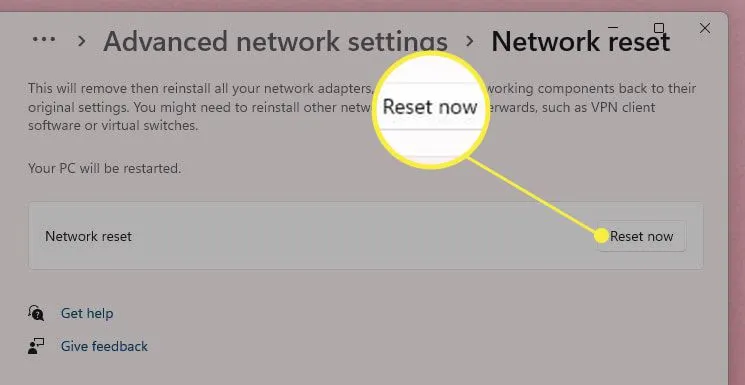
Windows 11: Settings > Network & Internet > Advanced network settings > Network reset
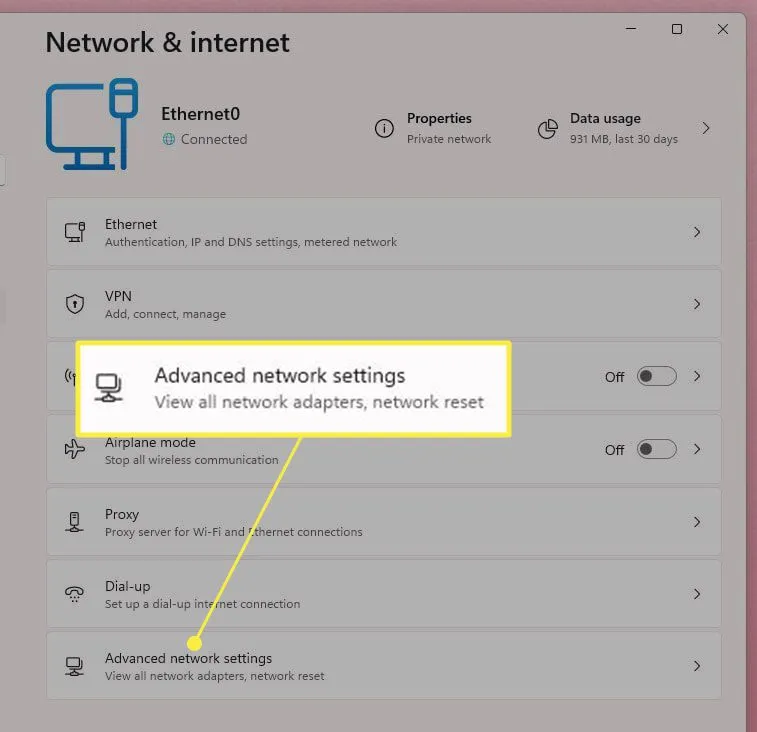
- Windows 10: Settings > Network & Internet > Status > Network reset
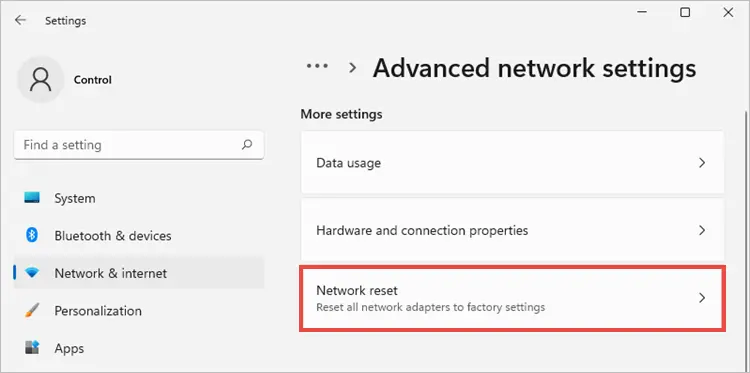
- Click “Reset now” and restart your PC.
Advanced Network Fixes (Command Prompt)
If standard fixes don’t work, try these commands:
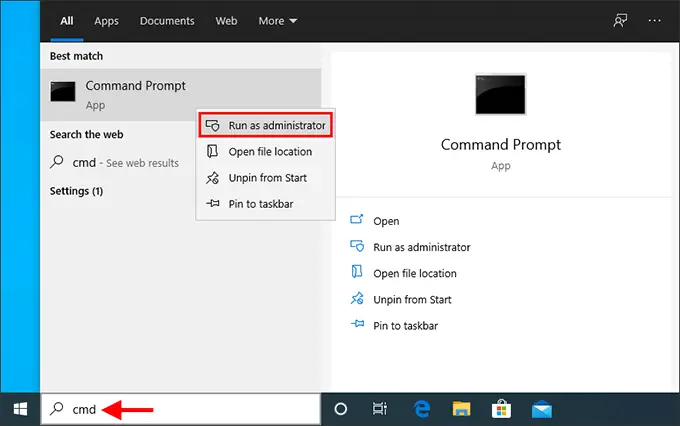
Open Command Prompt as Administrator:
Type
cmdin the search bar, right-click, and select “Run as administrator”.
2. Run these commands in order:
netsh winsock resetnetsh int ip resetipconfig /releaseipconfig /renewipconfig /flushdns
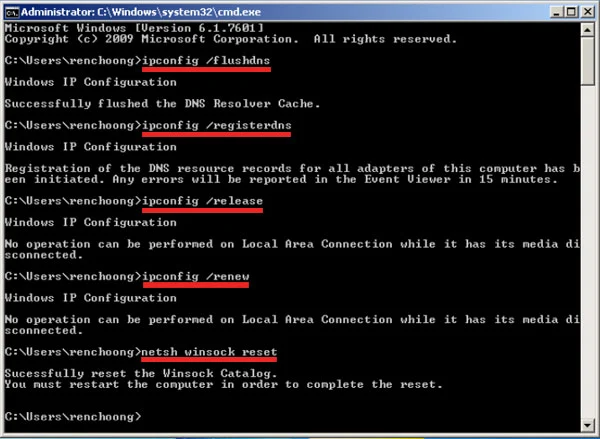
3. Restart your PC and try connecting again.
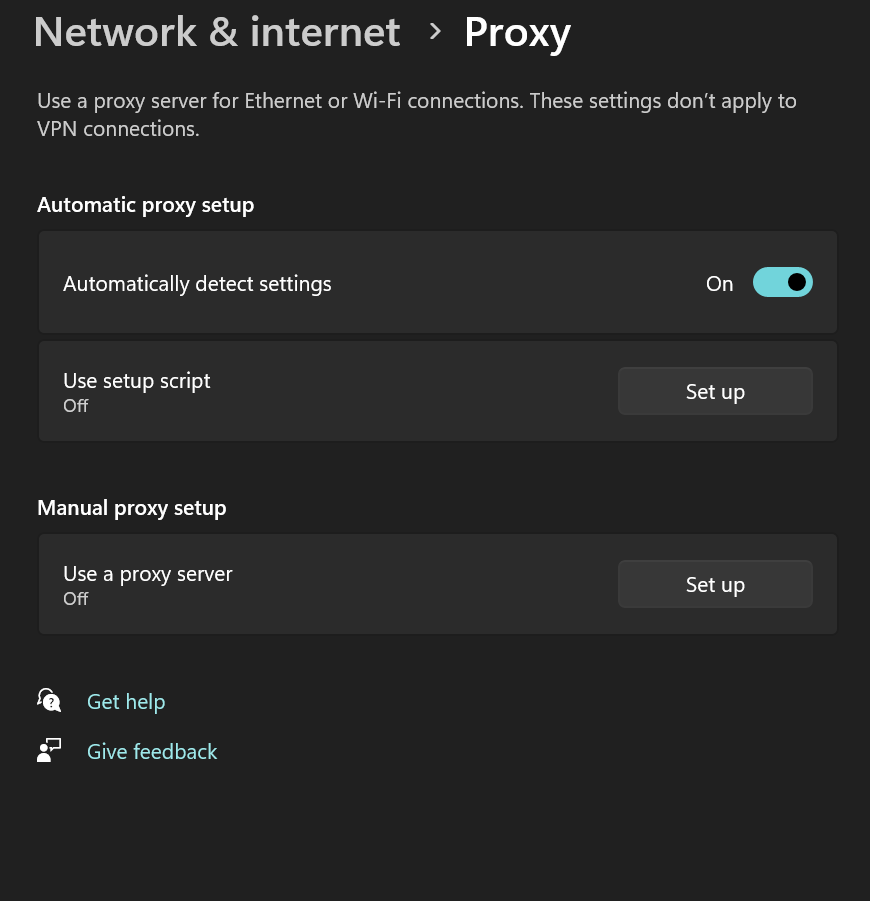
Check for Proxy Settings:
Go to Settings > Network & Internet > Proxy and turn off any manual proxy settings.
Check your IP address:
If your IP is
169.254.x.x, DHCP may be disabled on your router. Enable DHCP in router settings.
Optimizing Your Wi-Fi Connection
Place your router in a central, elevated location for best signal.
Limit interference: Keep away from microwaves, cordless phones, and thick walls.
Update router firmware regularly.
Use 5GHz band for faster speeds (if supported).
Set your network as private for easier sharing and discovery.
Set as metered connection if you have data caps:
Go to Settings > Network & Internet > Wi-Fi > Properties > Set as metered connection.
Security and Privacy Tips
Use WPA3 or WPA2 security for your Wi-Fi.
Change default router passwords.
Keep your Windows and router firmware updated.
Disable WPS after setup for better security.
Set your network profile to “private” for trusted networks.

Frequently Asked Questions (FAQ)
A: Download the latest driver from the manufacturer’s website using another device and install via USB.
A: Ensure your router is broadcasting the SSID and your device is within range.
A: Use the Network reset feature in Windows settings, then reconnect to your network.
A: Enable DHCP on your router or manually assign a valid IP address.
A: Go to Settings > Network & Internet > Advanced network settings > More network adapter options, right-click your adapter, select Properties, and set new DNS.
Related Resources
Conclusion
aka.ms/NetworkSetup is your trusted resource for setting up and troubleshooting network connections on Windows 10 and 11.
By following this guide, you’ll ensure a smooth, secure, and reliable internet experience on your Windows device. Bookmark this page and check back for updates as Microsoft continues to improve Windows networking.